Are you looking for a powerful Android IMEI Changer Tool to enhance privacy, bypass restrictions, or recover a lost IMEI? You're in the right place we’ll reveal the best IMEI changer tools.
Why Do People Need an IMEI Changer? (Legal Uses Only)
Changing your IMEI (International Mobile Equipment Identity) can be useful for:
1. Privacy Protection – Prevent tracking by third parties.
A serious security vulnerability has been discovered in the default web browser of the Android OS lower than 4.4 running on a large number of Android devices that allows an attacker to bypass the Same Origin Policy (SOP).
The Android Same Origin Policy (SOP) vulnerability (CVE-2014-6041) was first disclosed right at the beginning of September 2014 by an independent security researcher Rafay Baloch. He found that the AOSP (Android Open Source Platform) browser installed on Android 4.2.1 is vulnerable to Same Origin Policy (SOP) bypass bug that allows one website to steal data from another. Security researchers at Trend micro in collaboration with Facebook have discovered many cases of Facebook users being targeted by cyber attacks that actively attempt to exploit this particular flaw in the web browser because the Metasploit exploit code is publicly available, which made the exploitation of the vulnerability much easier.
The Same Origin Policy is one of the guiding principles that seek to protect users' browsing experience. The SOP is actually designed to prevent pages from loading code that is not part of their own resource, ensuring that no third-party can inject code without the authorization of the owner of the website. Unfortunately, the SOP has been the victim of Cross-Site scripting vulnerability in older versions of Android smartphones that helps attackers to serve the victims a malicious JavaScript file stored in a cloud storage account.
How would you feel if you can get all PC software, applications, and PC games running on your android smartphones? Sounds really Cool? The uses of Android devices are increasing rapidly, and you may want to install any windows based program into an Android device. But Android applications are all in APK format, and EXE files (executable setups) are specified for PC those are not supported by Android OS. Exe file only supports and runs the Windows-based applications; you cannot directly run them on any other operating system. Android devices support only (Android Application Package) APK file format that is solely for install in the Android operating system. There are different software packages for both Windows and Android designed for their specific Operating environment.
Android OS can only install .apk extension-based Applications. Also, there are plenty of Android Emulators that will let you run APK files on our PC, but there is no Windows Emulator for Android OS. So, for running a Windows-based application on your Android Device, you should Convert the Exe file into an Apk. The next question comes to mind is, "How to Convert EXE to APK"? Some experts say that: it is not possible to Convert EXE to APK extension. If somehow you pull it, you will not be able to run or execute that file on your Android Device. It would be outrageous for Android OS. If any software claims, that can be fake. But Some developers claim: In the present time, Yes, it is possible, there are a lot of methods and working software, and you can run windows based EXE on Android efficiently. It could be possible with .exe to the .apk converter (that mentioned below). With this simple conversion, you will be able to fetch all the software, games, and other application on your Android devices.
When you google it, you see there are many Windows-based applications available on the internet which claim to convert the EXE file into APK format, but most of them are fake or not working correctly. That's why I bring to you 100% tested and working methods. And at the end of this video, you will be able to Install any Windows programs on your Android-based device. The following procedure is one of the best and easiest ways to convert any EXE file to APK.
The necessary requirements for Exe to APK Converter Tool:
1- A .exe file you would like to Convert into .apk.
2- A PC/Laptop.
3- Exe to the Apk Converter tool.
HOW TO CONVERT EXE TO APK FILE
Exe to Apk Converter tool is a handy software that actually lets us Convert Exe Files to Apk files in just minutes. Are you ready to convert your EXE File to the APK file? Let’s get into it.
Step-1: Click on the above link to download the latest version of Exe to APK software and extract it to any folder of your choice.
Step-2: Launch the Converter tool software on your pc. Click the browse button and choose the file you would like to convert and wait for a few seconds until it loads successfully.
Step-3: Select the destination folder where you want to save after conversion.
Step-4: Hit the "ReBuild" button, the process will take a longer time as it needs to complete.
Step-5: Once done, a popup stating the confirmation of the completion.
Step-6: Just copy that APK converted the file to your device and Install using a package installer on your Android device.
Is your Windows PC slow, corrupted, or just broken? Before you factory reset and lose all your files, WATCH THIS.
I found a completely FREE, all-in-one tool that can repair hundreds of common Windows problems with a single click. No tech skills required! Most people panic and hit “Reset this PC” – but WAIT! Resetting takes hours, wipes out apps, and can still leave problems behind.
💡 Instead, there’s a FREE hidden repair tool that can instantly fix hundreds of Windows issues in just a few clicks – no reset needed.
Are you facing issues on Windows 11 or Windows 10 like:
❌ Windows running slow ❌ System files corrupted ❌ Internet not working ❌ File Explorer problems ❌ Windows Update errors ❌ Microsoft Store not opening ❌ Battery time missing ❌ Task Manager disabled
Most people think the only solution is to RESET their PC. But resetting takes hours and can make you lose apps, files, and settings.
🔍 What This FREE Tool Can FIX: ✔️ Corrupted System Files (SFC / DISM Scans) ✔️ Slow Performance & Freezing ✔️ Microsoft Store & App Issues ✔️ Wi-Fi & Internet Connectivity Problems ✔️ Missing File Explorer & Recycle Bin ✔️ Windows Update Errors (0x8007007b etc.) ✔️ Windows Settings App Not Opening ✔️ Task Manager & Registry Editor Disabled by Admin ✔️ Windows Defender & Security Center Bugs ✔️ Blue Screen (BSOD) related system file issues ✔️ ...and HUNDREDS of other small, annoying problems!
👉 Instead, in this video I’ll show you an amazing FREE tool – FixWin 11 / FixWin 10 – that can repair hundreds of Windows problems in just a few clicks WITHOUT resetting your computer.
🔥 What this tool can fix: File Explorer errors (Recycle Bin missing, icons not refreshing, thumbnails not showing, etc.) Internet & connectivity problems (DNS, Wi-Fi issues, Firewall reset, update history errors) System fixes (Settings app not opening, OneDrive issues, Sandbox errors, Windows Update failures) System Tools (Task Manager/Command Prompt/Registry disabled, Defender repair, Windows Search reset) Troubleshooters (Audio, Printer, Power, Network Adapter – even in Windows 11 where these are hidden!) Additional fixes (Hibernate option missing, Sticky Notes restore, icons corrupted, taskbar issues) Quick fixes (Reset group policy, reset Notepad, reset DNS, reset Winsock, keyboard settings, and more)
⚡ How to use the tool: Download FixWin from the official Windows Club page (link below). Extract the ZIP file. Run FixWin11.2.exe as Administrator. Choose your category (File Explorer, Internet, System Fixes, Troubleshooters, etc.)
. Apply the fix with just ONE click. Restart your PC if required — and your issue should be gone.
✅ Instead of wasting time with resets, this tool gives you fast, effective fixes for common and advanced Windows issues.
🔥 In this video, you’ll discover: ✔️ The tool Microsoft doesn’t advertise but every Windows user should know ✔️ How to repair Windows 11/10 errors without losing files ✔️ One-click fixes for File Explorer, Internet, Wi-Fi, Updates, Store, and more ✔️ Hidden troubleshooters you didn’t even know existed in Windows 11 ✔️ Pro tricks to bring back missing features like Hibernate, Task Manager, Sticky Notes, etc.
⚡ Why waste time resetting when you can: ✅ Save HOURS of frustration ✅ Keep all your apps & files safe ✅ Fix problems instantly with just ONE click
📥 Download FixWin here: Fix 11 (for Windows 11): https://www.thewindowsclub.com/fixwin-windows-repair-software 💡 Timestamps / Sections Covered: Are you tired of your Windows acting up? 😡 👉 Slow performance… 👉 Corrupted files… 👉 Wi-Fi & Internet not working… 👉 Microsoft Store not opening… 👉 File Explorer errors… 👉 Windows Update failing again & again…
🎯 Why watch this video? Save time ⏳ (no reset needed) Save data 💾 (keep your files and apps) Solve problems in seconds ⚡ Learn hidden Windows repair tricks
🤔 Who Is This For? This is for ANY Windows 10 or Windows 11 user who is experiencing: → Constant slowdowns and crashes → Error messages they don’t understand → Features that suddenly stopped working → The urge to reset their PC out of frustration
✨ Why This Tool Beats a Factory Reset: → Saves HOURS of reinstalling Windows and your programs. → Keeps ALL your personal files and data 100% safe. → Targets the specific problem instead of a nuclear option. → It’s 100% FREE with no bloatware or hidden costs.
👉 If this video helps, LIKE 👍, SUBSCRIBE 🔔, and SHARE to support the channel. I’ll see you in the next one. Until then, take care and happy fixing! 💻
⚠️ IMPORTANT DISCLAIMER: Use this tool at your own risk. Always create a system restore point (shown in the video) before applying fixes. I am not responsible for any system instability, though I have used this tool safely for years.
Fix Windows 10 Startup Problems | Blue Screen, Automatic Repair Loop, Boot Errors [FULL GUIDE]
In this tutorial, I’ll show you multiple ways to fix Windows 10 startup problems — including:
✔ Automatic repair loop
✔ "Your PC did not start correctly" error
✔ Infinite booting or restarting
✔ Other common blue screen issues
This step-by-step guide will walk you through everything — from a simple restart to using the command line to restore the registry. Whether your system won’t boot after an update, a crash, or an unknown cause — this video has you covered.
📌 What’s Covered in This Video:
🔹 Blue Screen Error Explanation
When I power on the laptop, it shows:
“Automatic Repair — Your PC did not start correctly.”
After attempting repair, it then says:
“Startup Repair couldn’t repair your PC.”
You might see a different error — infinite loop, boot failure, etc.
🔹 Common Causes of Startup Errors
• Power failure or sudden shutdown
• Incompatible hardware or USB drives
• Buggy software or recent updates
🔹 How to Choose the Right Fix
Not all fixes are needed for everyone. Try the first one, and move to the next only if the issue continues.
🛠️ Fix 1: Just Restart Your PC
Sometimes the issue resolves with a simple restart — especially if it was a one-time crash or hardware glitch.
Remove any external devices (USBs, HDDs) before trying again.
🛠️ Fix 2: Use the Startup Repair Tool
Go to Advanced Options > Troubleshoot > Advanced Options > Startup Repair.
Follow the on-screen steps — select user account, enter password, let it diagnose.
Watch for messages like:
• Diagnosing your PC
• Checking disk
• Attempting repairs
If it fails or runs too long, continue with the next method.
🛠️ Fix 3: Restore Registry via RegBack
This method restores your registry settings from a last known good backup.
Steps:
1. Go to Command Prompt from Advanced Options.
2. Find your Windows drive (C:, D: etc.) using dir.
3. Navigate to:
cd \windows\system32\config
4. Backup current registry:
md backup
copy *.* backup
5. Access RegBack folder:
cd regback
dir
6. If files show valid sizes (not zero), type:
copy *.* ..
Press A to allow overwrite
7. Exit and restart
❗ If file sizes show zero, don’t use this method — move to the next solution.
🛠️ Fix 4: System Restore (Requires Bootable USB)
If none of the above work, use a bootable Windows 10 USB drive and run System Restore.
[Create USB guide is linked in the pinned comment or description]
✅ Conclusion
Hopefully, one of these methods helped you fix your PC and boot back into Windows 10.
👍 Like this video if it helped
📢 Share with anyone struggling with boot issues
🔔 Subscribe and turn on notifications for more useful tech fixes!
🛠️ How to Fix Windows 10 Startup Errors | Automatic Repair Loop, Infinite Booting, & Blue Screen Fixes
In this tutorial, I’ll walk you through multiple ways to fix common Windows 10 startup problems — including:
✅ Automatic Repair Loop
✅ "Your PC did not start correctly" Error
✅ Infinite Booting
✅ Startup Repair Couldn’t Repair Your PC
✅ Other Blue Screen Errors
We’ll go step by step, covering every potential fix you can try:
🔹 Method 1: Restart Option
🔹 Method 2: Using Startup Repair Tool
🔹 Method 3: Registry Backup Using the regback Command
🔹 Final Method: System Restore via Bootable USB (if all else fails)
These errors can occur due to things like:
• Abrupt shutdown or power loss
• Recent Windows updates
• Incompatible hardware or USB devices
• Software changes or installations
🖥️ Whether you're facing an infinite boot loop or your PC is stuck on a blue screen, this video gives you clear solutions — with no steps skipped.
💡 Product Keys & Software Links:
✅ Windows 10 Pro Key ➤ https://bit.ly/3gCu6VK
✅ Windows 11 Pro Key ➤ https://bit.ly/31jyHdg
✅ Office 2019 Pro Plus Key ➤ https://bit.ly/2G8nLoq
✅ Office 2021 Pro Plus Key ➤ https://bit.ly/3q4P089
✅ All Other Software Deals ➤ https://bit.ly/3r03TYu
If you want to stay anonymous on Facebook, then you are at the right place because I’m going to show you how to make your name invisible on Facebook.How to Hide Name on Facebook.
How To Make Invisible Name On Facebook | Create Facebook Invisible Blank Name
✅ Step 1: Navigate to Settings
Tap on the three horizontal lines at the top-right corner.
Scroll down and select Settings.
Tap on Personal and Account Information, then Your Name.
✅ Step 2: Add a Nickname
The first step here is to add a nickname.
Tap on Add a Nickname at the bottom of the page.
Enter any name of your choice.
Select Show at Top of Profile and then tap on Save.
Now, let’s go back to our profile and check if the nickname is visible.
Okay, it’s visible there.
✅ Step 3: Access the Name Change Form
Now, go back to Settings → Personal and Account Information → Name.
This time, tap on Learn More (highlighted in blue).
You’ll see another page. Scroll down and tap on Find Out Why.
Scroll all the way down again and then tap on Fill Out This Form (highlighted in blue).
Now, you’ll see this form that will help you make your name invisible.
But listen carefully before you comment that your options look different.
I’m using an old version of Facebook Lite. If you have the latest version, the process is slightly different.
✅ For the Latest Facebook Version
Tap on Manage Other Names to add a nickname.
Then, tap Learn More.
Scroll down and select Names Allowed on Facebook, then tap on Find Out Why.
Now scroll down and you’ll find Fill Out This Form.
Now everything should be clear, right? So let’s move on.
✅ Step 4: Copy Invisible Symbol
Go to the description of this video.
Copy the invisible symbol given there.
Make sure you copy only the character inside the brackets – it’s a bit tricky, so do it carefully.
✅ Step 5: Fill Out the Form
Paste the invisible symbol twice in the First Name section.
Leave the Middle Name empty.
In the Last Name, enter the nickname you added earlier.Make sure there’s a space before the nickname, then paste the invisible symbol twice after it.
Scroll down:
No need to attach any documents.
Enter the email linked to your Facebook account. If there’s none, you can use a new one.
Tap on the Send button (highlighted in blue).
That’s it! The process is now complete.
✅ Step 6: Check Results
Go to your profile, refresh the page a few times, and wait
And look at this, guys – our name is invisible now!
Only the nickname is showing, so let’s remove that too.
✅ Step 7: Remove the Nickname
Scroll down and tap on See More About Yourself.
Tap the pencil icon next to the nickname.
Tap on Delete Nickname.
Now, go back to your profile…
And there you have it – the nickname is gone, and your Facebook name is completely invisible!
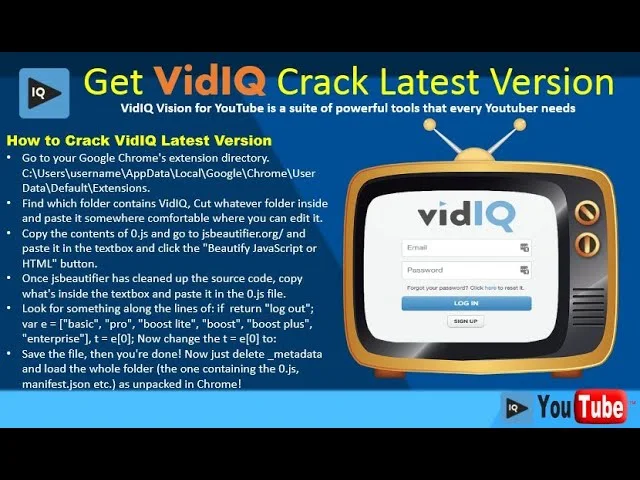
How to Get VidIQ Crack | VidIQ pro crack | VidIQ Chrome Extension! :
This short video is all about “How to Get vidIQ Boost Crack version for free - VidIQ Vision for Youtube – VidIQ Chrome extension premium version”. After watching this tutorial you will be able to get vidIQ pro crack and the most updated version of VidIQ enterprise chrome extension for free. Just follow these steps and you will be able to get the VidIQ enterprise edition for youtube to grow your channel faster and high rank by using this VidIQ pro-crack-free. In this detailed video, I have mentioned some easy steps that how you can get the VidIQ pro crack version for free of cost.
Every YouTuber and creator knows that VidIQ crack enterprise edition is a handy tool because it is one of the best online tools that provide all video features and has the ability to the analysis of videos, channels information, and statistics. Also, help to find the most important tags which suit to Youtube video and some other information to rank YouTube Videos on First Page. Want to launch your YouTube channel? VidIQ enterprise crack can help to make your YouTube goals a reality and bring it to a whole new level. VidIQ's Latest cracked version is packed full of actionable suggestions, aspects of creating, publishing, and optimizing video content. With the VidIQ enterprise crack version, you can absolutely crush your YouTube goals. If you ever think that How to get the VidIQ Crack Latest version, then don't worry. Today in this video, I will show how to crack VidIQ Latest Version to get Pro features. There is no rocket science to getting VidIQ Crack Latest Version, Just follow my steps.
Step 1: Install the Latest VidIQ Extention from "https://vidiq.com/, also available in Chrome Store. Now on your computer, open the chrome extension folder. Its at : C:\Users\YourUserName\AppData\Local\Google\Chrome\User Data\Default\Extensions\pachckjkecffpdphbpmfolblodfkgbhl Step 2: Inside "pachckjkecffpdphbpmfolblodfkgbhl" folder, copy the folder with Version Code of VidIQ and past it. Step 3: Open the copied folder and delete the "_metadata" folder, which is already inside the extension folder. Now search for the file "bundle.bundle", right-click to open this file with notepad++. If you haven't installed Notepad++, search it in google and install it first. Step 4: Click the Edit menu or press Ctrl + F to open Find. Type "t=e[0] and click on find button and Replace it into : t=e[1] for pro t=e[2] for boost lite t=e[3] for boost t=e[4] for boost plus t=e[5] for enterprise Click on "Save" and exit the notepad++. Step 5: Open the Chrome browser, go to the extensions page and uninstall the VidIQ plugin. Step 6: Turn on the "Developer Mode" and click on "Load unpacked." Now just select that extension folder. That's it, vidIQ Vision for YouTube is now fully cracked. Using this method, you can quickly get a free VidIQ vision Cracked Version for youtube. If this method didn't work for you, comment below, and I would try to help you.
Get VidIQ Crack Latest Version. Rank YouTube Videos on First Page. How to Crack Vidiq Boost Package for Free. VidIQ vision Hack Full. How to get VidIQ pro for youtube. How to get VidIQ Crack Free and Vidiq vision for youtube. vidiq crack how toHow to get VidIQ Crack 2021 Free vidiq boostvidiq pro vidiq premium free vidiq enterprise vidiq boost crack crack vidiq vison #VidiqLatestCrack #VidiqCrack